Contact Us
26041 Newton Circle
Elko New Market, MN 55020
ndsdrillingsupply@gmail.com
1-800-637-1940
(952) 461-3400
(952) 461-3403 (fax)

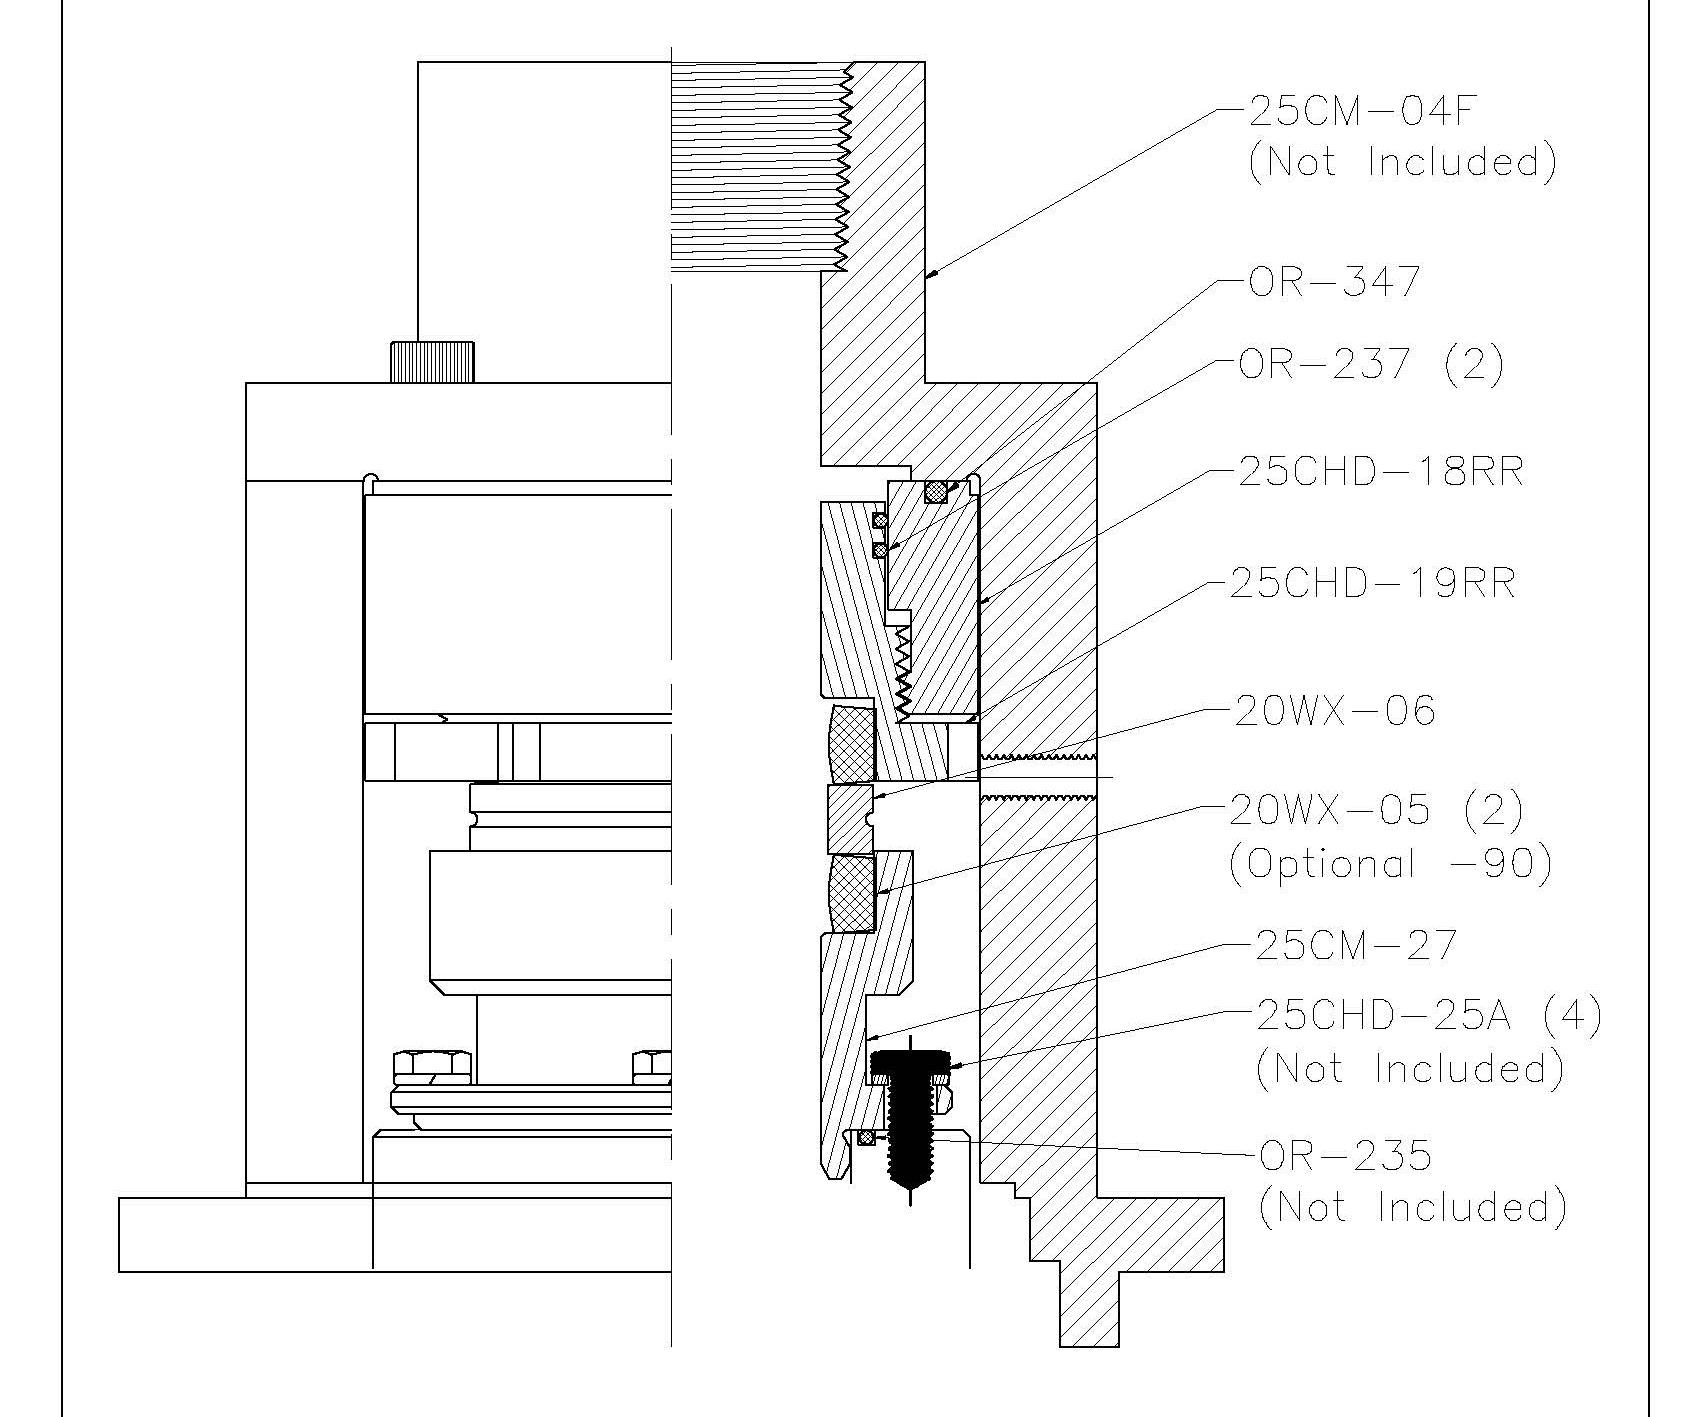
25CHD-50RR
INSTALLATION
25CHD-50RR
- Bring swivel down to a safe working height or remove it from the drilling machine.
- Stop the flow of drilling element (mud and/or air)
- Remove the four cap screws holding the packing box to the bonnet, 25CM-18A; these bolts are located around the hose connection of the bonnet.
- Remove the four (4) Hex Head Bolt, part number 25CHD-25A, securing the wash-pipe to the bearing spindle.
- Collapse the packing assembly and remove through window of bonnet.
- Clean the face of the bonnet where the packing box seated and the face and bore of the bearing spindle where the wash-pipe was seated.
- Install the O-ring, OR-235 into the groove on the bearing spindle.
- Install the Packing Nut, Lower, 25CM-27, onto the spindle. Evenly bolt down using the four (4) removed Hex Head Bolts, 25CHD-25A.
- Install the O-Ring, OR-347, onto the top face of the Top Plate, 25CHD-18RR.
If this is a NEW Assembly the Adjusting Gland, 25CHD-19RR, with O-rings will be thread into the Top Plate, 25CHD-18RR. If rebuilding an existing unit or assembling a unit from pieces.
Install (2) O-Rings, (OR-237) into the grooves of the Packing Adjusting Gland.
Lubricate the threads of the Packing Adjusting Gland and Top Plate.
Screw Packing Adjusting Gland into Top Plate, THIS IS A LEFT-HAND THREAD.
Screw these parts together until it stops.
- Slide this Assembly into the bonnet and bolt to the upper face of bonnet using the (4) removed Bolts, 25CM-18A. Bolt up evenly, BE SURE NOT TO COCK THIS ASSEMLBY WHILE BOLTING UP.
- Install a piece of packing into the packing bore of the Packing Nut, Lower, 25CM-27 and a piece of packing into the packing bore of the Adjusting Gland, 25CHD-19RR
- Install Wear-bushing, 20WX-06 into this assembly. The Wear-bushing should set on the packing of the Packing Nut, Lower. The walls of this bore should keep the Wear-bushing centered.
- Un-screw the Packing Adjusting Nut (LEFT HAND THREAD) until the packing of the Adjusting Nut contacts the face of the wear-bushing.
- Crush the packing(s) by un-screwing the Packing Adjusting Nut to make the initial seal. General rule is to crush the packing only enough the seal. Over crushing will reduce packing life and shorten the life of the Adjusting Nut and Packing Nut, Lower.
The greater the working pressure the less crush the packing requires.
SUGGESTED CRUSH:
At working pressure between 0 – 150 PSI: 0.187 (a turn and one half after contacting wear-bushing)
At working pressure between 151 – 250 PSI: 0.125 (one turn after contact wear-bushing)
At working pressure between 251 and up: 0.90 (three quarters of a turn after contact wear-bushing)
- Install the Packing Adjusting Gland Lock Bolt and Nut into the drilled and tapped hole on side of bonnet. If Bonnet does not have this hole, IT MUST BE DRILLED AND TAPPED before using swivel.
Hole should be drilling 5/16 and tapped 3/8-16, option drill 27/64” and tap ½”-13 at location shown on drawing PP-101.
- Tighten Lock Bolt against the Packing Adjusting Gland and tight Lock Nut of Lock Bolt against the side of bonnet.
ADJUST or PACKING CHANGE
To Adjust Packing
- Loosen the Lock Bolt located on the side of the Bonnet.
- Un-Screw the Packing Adjusting Gland to crush packing, THIS IS A LEFT- HAND THREAD. Crush only enough to cause seal. Suggest adjusting in quarter turns.
- Tight Lock Bolt and nut.
- Repeat this procedure until the packing life is exhausted. Packing Life is EXHAUSTED WHEN THE FACE OF THE ADJUSTING NUT IS WITHIN A 1/8” OF THE PACKING NUT. To continue this adjustment procedure after this point will damage these two parts.
TO CHANGE PACKING
- Loosen the Lock Bolt on the side of the bonnet.
- Screw the Packing Adjusting Gland back into the Top Plate. (LEFT HAND- THREAD)
- Remove the wear-bushing through the opening between the Top Gland and the Packing Nut, Lower.
- With a flat bladed screwdriver remove the upper piece of packing from the Adjusting Gland and the lower piece of packing from the Packing Nut, Lower.
- Clean both packing bores.
- Install new Packing Rings (20WX-05). NEVER CHANGE A SINGLE PIECE.
- Install Wear bushing (20WX-06) onto packing of Packing Nut, Lower. A Wear-bushing will normal last two packing changes. They do not have an infinite life.
- Un-Screw the Packing Adjusting Gland to crush packing.
- Tighten the Lock Bolt and Lock Nut.